Author: Service Lifter

Cosmetic Tooth Bonding

We are proud of the ways in which dentistry can restore broken or decayed teeth to full beauty and function. One of the easiest and least expensive ways of doing this is with dental bonding.

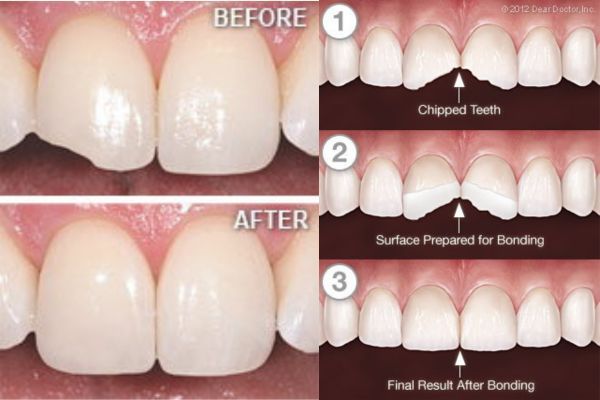
Bonding uses tooth-colored materials to replace missing tooth structure or hide cosmetically unappealing minor defects in a tooth — chips, discoloration, and even minor spacing irregularities. Bonding materials are called “composite resins” because they contain a mixture of plastic and glass, which adds strength and translucency. The composite actually bonds, or becomes one, with the rest of the tooth.

Composite resins come in a variety of tooth shades for truly lifelike results. When bonding is done with a skilled hand and an artistic eye, it may be impossible to distinguish the bonded tooth from its neighbors. Though bonding will not last as long as a dental veneer, it also does not require the involvement of a dental laboratory and, most often, can be done without drilling of the tooth. It’s a particularly good solution for teens, who often need to wait until their teeth have finished maturing before choosing a more permanent type of dental restoration.

The Bonding Process

Because it does not involve dental laboratory work, tooth bonding can usually be accomplished in a single visit to the dental office. Expect the whole procedure to take 30 minutes to an hour. First, the surface of the tooth to be bonded will be cleaned so it is plaque-free. The surface will then need to be “etched” with an acidic gel that opens up tiny pores in the surface. After the etching gel is rinsed off, the liquid composite resin in a well-matched shade is painted on in a thin layer, filling these tiny pores to create a strong micromechanical bond. A special curing light is used to harden this bonding material. Once the first layer is cured, another layer is painted on and cured. Layers can continue to be built up until the restoration has the necessary thickness. The bonding material is then shaped using a dental drill to give it just the right form. Once the tooth not only looks great but fits in perfectly with your bite, it will receive a final polishing.

Caring for Bonded Teeth

Bonded teeth should be brushed and flossed daily, and professionally cleaned at the dental office twice per year, just the same as the rest of your teeth. The most important thing to keep in mind about caring for your bonded tooth is that composite resin can absorb stain, just as natural teeth can. Therefore, you will want to avoid smoking, red wine, coffee and tea to the extent possible. Also, while composite can darken, it cannot be lightened. So if you are thinking about having your teeth whitened, it should be done before your tooth is bonded so that a composite shade can be selected to match the lighter color of your whitened teeth. If you whiten your teeth after bonding, the bonded tooth may not match all the rest. Finally, try not to bite your nails, hold writing implements in your mouth, or use your teeth in other ways that could put excessive force on the bonding material and chip it. With proper care, a bonded tooth should stay beautiful for 3 to 10 years.

Teething

New parents sometimes anticipate their baby’s first tooth with a mixture of excitement and worry. While reaching a new developmental milestone is always a cause for celebration, this particular one can come with considerable discomfort. However, teething is different for each baby, and need not be painful at all; plus, there are steps you can take to make the process easier for your baby — and yourself.

Teething refers to the process by which primary (baby) teeth emerge through the gums and become visible in the mouth. This usually begins between six and nine months of age, though it may start as early as three months or as late as one year. Usually, the lower front teeth erupt first, followed by the ones directly above. Most children have all 20 of their primary teeth by the age of 3 (View Tooth Eruption Chart).

Recognizing the Signs

Common signs that your baby is teething include:

  • Irritability
  • Biting and gnawing
  • Drooling
  • Chin rash (caused by excessive salivation)
  • Swollen gums
  • Ear rubbing
  • Decreased appetite
  • Disrupted sleep patterns

You are most likely to notice any of the above from about four days before the tooth breaks through the gums up until three days after the tooth appears.

A less common teething issue is the formation of an “eruption cyst,” a small bubble-like swelling filled with fluid that covers an erupting tooth. Eruption cysts usually do not require treatment as the tooth will simply pop the cyst when it comes through.

While there has been some disagreement as to whether diarrhea, rashes and fever are signs of teething, these are more likely to be associated with an unrelated illness and should be reported to your pediatrician.

How to Help

Teething babies get the most relief from cold and/or pressure on the affected area. This can be applied with:

  • Chilled teething rings
  • Cold, wet washcloths
  • Chilled pacifiers
  • Massaging baby’s gums

Make sure not to actually freeze your baby’s teething ring or pacifier because this could burn if left in the mouth for too long. The outmoded “remedy” of rubbing whiskey or other alcohol on the gums is neither effective nor appropriate. Over-the-counter medication may be helpful, but always check the correct dosage with your pediatrician or pharmacist. These, too, should not be rubbed on the gums because they can burn. Numbing agents shouldn’t be used on babies under age 2 unless directed by a physician.

Remember, it’s best to start dental visits by your child’s first birthday to establish this lifelong health-promoting routine (View Age One Dental Visit Video).

Teeth Whitening

It’s hard to imagine anything more appealing than a sparkling, white smile. Yet our teeth rarely stay as white as we’d like them to without a little help. Fortunately, that help is available at the dental office.

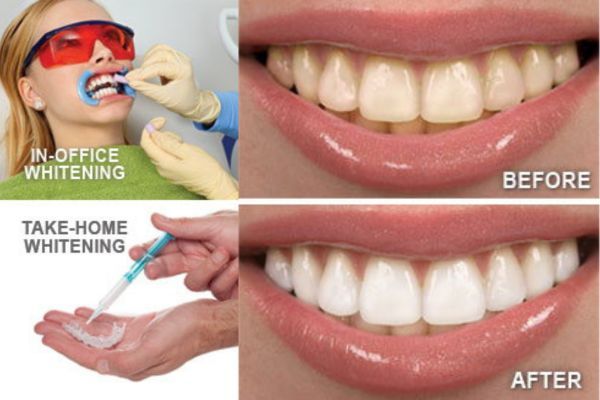
Teeth whitening done in a professional dental setting is a safe, effective way to brighten your smile. It’s also perhaps the most economical cosmetic dental procedure. Depending on the whitening method you choose, results can be dramatic: in-office whitening, for example, can lighten teeth three to eight shades in a single hour.

Professionally supervised whitening will work faster, and protect sensitive gums and tooth-root surfaces better, than over-the-counter whitening products. Having an oral exam before you begin any whitening process is an important first step to make sure your tooth discoloration is not the result of a dental condition in need of treatment. Also, please be aware that it can be risky to have whitening solutions applied to your teeth by untrained personnel in shopping malls. If you have any questions about which whitening method would be best for you, talk to us first.

Professional Whitening Methods

Professional whitening makes use of high-concentration bleaching gels that are not available over the counter.

  • In-Office Whitening — This technique offers the fastest results with the most powerful whitening solutions available. First, your gums and tooth-root surfaces will be covered with a protective barrier to ensure your safety. A thin plastic device known as a retractor will hold your lips and cheeks away from your teeth as a professional-strength hydrogen peroxide gel is applied. The gel will be left on for about an hour. When it is removed, the results will be obvious immediately.
  • Take-Home Whitening — This is another effective way to whiten your teeth, though you will play a greater role in ensuring the best possible results and several weeks may be needed to achieve your desired level of whiteness. First, a mold of your teeth will be taken and then two thin, flexible plastic mouth trays will be custom-made for you — one for the top teeth and one for the bottom. You will fill the trays with whitening gel and then position the trays over your teeth. The trays are left in usually for about an hour at a time.

Caring for Your Whitened Smile

There are lots of things you can do to make sure your whitening results last as long as possible, and this will vary from person to person (six months to two years or even longer). First of all, please maintain your usual, conscientious routine of brushing and flossing every day, and keep up with your regular schedule of professional cleanings at the dental office. Avoid foods and beverages that stain, including red wine, tea and coffee. If you smoke, use your newly whitened teeth as an impetus to quit — a good idea in any event! A minor touch-up every so often, either at home or at the dental office, can keep your smile bright and beautiful for years.

Same-Day Crowns (CAD/CAM)

A tooth that has been structurally damaged by decay or trauma sometimes needs to be crowned or “capped” so that it can look good and function properly again. A crown is a durable covering that is custom-made to fit over the entire tooth from the gum line up. Crown fabrication traditionally takes place in a dental laboratory. But these days, there’s a much more convenient alternative: same-day crowns made in the dental office.

Advanced dental technology known as Computer-Aided Design/Computer-Aided Manufacturing, or CAD/CAM, makes it possible to fabricate laboratory-grade crowns and other dental restorations in minutes. It’s an amazing innovation when you consider that traditionally, crowns take two or three visits and just as many weeks of waiting. Now you can have a restored tooth without the wait.

Best of all, studies have shown that CAD/CAM tooth restorations are just as successful as crowns made with traditional materials and techniques. And the amazingly lifelike appearance of a same-day crown means that no one will know your tooth has been restored.

How It Works

The process of crowning a tooth starts out the same way, whether it’s a same-day crown or traditional crown: with “preparation” of the tooth. This involves removing any decay that’s present, and shaping the tooth with a dental drill so that it will fit perfectly inside the crown. But the similarities end there.

If you were getting a traditional crown, the next step would be to take an impression (mold) of your teeth with a putty-like material, and use it to construct a model on which to create the crown. With a same-day crown, your teeth are simply given a light dusting of reflective powder and then a small scanning wand attached to a computer is used to take digital pictures inside your mouth. In seconds, the computer will generate a highly accurate 3D model of your teeth. But it gets even better.


With the help of the CAD/CAM software, your crown will be designed while you wait. The software can even be used to create a mirror-image twin of the same tooth on the other side of your mouth, for the most natural-looking result possible. Then a block of dental ceramic material is chosen in the shade that most closely matches your own teeth. The computer’s digital design is transmitted to a milling machine that carves the crown from the ceramic block in about five minutes.

Once the crown’s fit has been verified, and any necessary aesthetic enhancements have been made to the crown’s surface (staining and glazing, for example), the crown will be bonded to your tooth. With a traditional crown, you would have to wear a temporary restoration for several weeks while the permanent crown was being fabricated at the lab. With a same-day crown, you walk out with the real thing.

Caring for Your Same-Day Crown

Crowned teeth require the same conscientious care as your natural teeth. Be sure to brush and floss between all of your teeth — restored and natural — every day to reduce the build-up of dental plaque. When you have crowns, it is even more important to maintain your regular schedule of professional cleanings at the dental office. Avoid using your teeth as tools (to open packages, for example). If you have a grinding habit, wearing a nightguard would be a good idea to protect your teeth and your investment. A well-cared-for same-day crown will last for years to come.

Post-Orthodontic Care

One day in the not-too-distant future, your braces will come off. In a few moments, you’ll be free of bands and brackets, able to eat what you want and run your tongue over smooth, clean teeth. But, even on this happy occasion, please remember that you’re not quite done with orthodontic treatment yet: The next phase, called retention, is just beginning.

Retention is a critical follow-through stage that typically involves wearing an orthodontic appliance called a retainer. Several different kinds of retainers are available, all of which are custom-made.

But if your teeth are straight now, why do you need a retainer at all? Simply put, it’s because if you don’t wear one, your teeth will start moving right back to where they were!

Teeth aren’t set rigidly in the jawbone — instead, they’re held in place by a network of fibers called the periodontal ligaments. After they have being moved, it takes several months for the periodontal ligament to adjust to the new position. So if you want to keep that new smile — and not waste all the time, effort, and money it took to get it — it’s essential to wear your retainer as directed.

Being fitted for a retainer usually happens on the same day your braces are removed. After your teeth are thoroughly cleaned, another set of X-rays and/or bite impressions may be taken to check how well your braces worked and to see how much your wisdom teeth have developed. Then, a retainer will be prepared for you.

Three Types of Retainers

There are three basic types of retainers available today; each works best in particular situations. The most common is the so-called “Hawley” retainer — a thin, tongue-shaped piece of acrylic molded to fit your mouth, with a wire that holds your teeth in position. The Hawley retainer is simple, durable and easily removed. It’s even possible to personalize it by choosing different colors and designs for the plastic arch.

Another popular style of retainer is the clear aligner-type, which looks similar to the Invisalign® tray system. These retainers are custom-made of thin, transparent plastic designed to fit precisely over your teeth. Their main advantage is that they’re invisible, with no wire to show. These retainers are also easy to remove, but they may be somewhat less durable than the Hawleys. They aren’t recommended for patients with certain conditions, like teeth grinding.

Finally, fixed retainers may be an option for some people, especially on the lower front teeth. As their name implies, they aren’t removable by the wearer — but they aren’t visible either. Like lingual braces, this system uses a wire which is bonded to the tongue side of the teeth. It may remain in place for months, or longer. This type of retainer is sometimes recommended when there’s a high risk that teeth could revert to their former position.

A Period of Adjustment

After a short time, most people adjust quite well to wearing a retainer. Some may find that they produce more saliva than usual for a day or so after first wearing any type of retainer — a normal reaction to a foreign object in the mouth. You may also find it a little harder to talk normally at first, but that problem will soon disappear. Of course, removable retainers should always be taken out when you eat or brush your teeth — a big change from braces!

At first, you will probably be told to wear your removable retainer all day, every day. This period of 24/7 retainer use generally lasts from several months to a year. Later, it may be OK to wear it only at night. Finally, you’ll probably need to put it on just a few nights a week.

Maintaining — and Retaining — Your Retainer

To stay fresh and germ-free, all retainers need proper cleaning. A Hawley-type retainer can be brushed gently with a regular toothbrush — but a brush may scratch the clear aligner types. Denture cleaners, in powder or tablet form, as well as special retainer cleaners, can be used to clean most removable retainers. Fixed retainers are cleaned by brushing and flossing; a floss threader or interproximal brush can also be a helpful cleaning tool when needed.

Finally, remember to always carry — and use — a retainer case. You’d be surprised how many retainers end up folded in a napkin and accidentally discarded! Also, don’t expose your retainer to excess heat by washing it in very hot water or leaving it on a heater: That can cause the retainer to warp and make it unusable. With proper care and conscientious use, a retainer can help you transition from braces to a permanent, healthy smile.

Removable Dentures

Full or partial tooth loss, if left untreated, doesn’t just affect a person’s self-image — it can also increase the risk of developing nutritional problems and other systemic health disorders. Fortunately, there’s a reliable and time-tested method for treating this condition: full or partial dentures.

Dentures are just one option for replacing missing teeth; some of the others include fixed bridgework and dental implants. Each method has its particular pluses and minuses, which should be carefully considered. There are also several varieties of dentures available to address specific issues, from partial dentures to implant-supported overdentures. The best option for you will depend on your individual situation.

How Do Removable Dentures Work?

Full or partial dentures consist of a gum-colored base made of plastic resin, which fits over the remaining alveolar (bone) ridge that formerly held the teeth. The prosthetic teeth projecting from the base are designed to look and function just like your natural teeth. Dentures are held in place primarily by the suctioning effect of their close fit against the alveolar ridges — that’s why it’s so important that they are fitted properly. The upper denture also gets extra support from the large surface area of the roof of the mouth (palate), which generally makes it extremely stable.

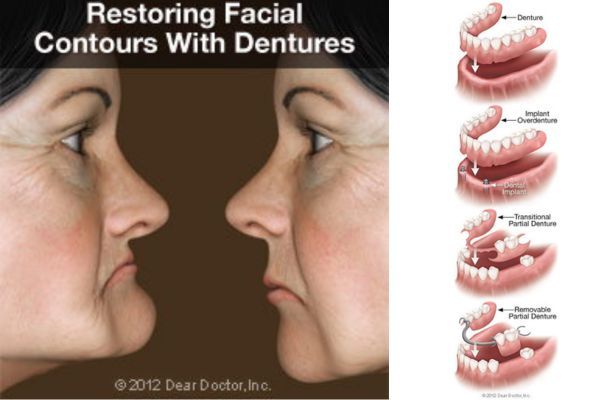
At first, wearing dentures may require some getting used to in terms of talking and eating, as the dentures become “balanced” in the space formerly occupied by the teeth. But over time, the muscles, nerves and ligaments of the mouth learn to work in new ways, which allows these functions to occur normally. Dentures also help support the facial skeleton and the soft tissues of the lips and cheeks, which can help create a more youthful appearance.

Types of Full Dentures

Immediate Dentures: These are usually a temporary means of helping you transition to successful denture wearing. Because of the muscular readjustment required, as well as the natural shrinkage of gums, the dentures which are placed immediately after tooth extraction won’t fit as well as permanent dentures made when the healing is complete. They do, however, provide you with new teeth right away, and give you time to adjust.

Conventional Full Dentures: After a period of time, permanent dentures that conform to your mouth with near-perfect accuracy can be fabricated. These are carefully crafted to look as much like your own natural teeth as possible, and are able to function properly in your mouth for a long time.

Implant-Supported Overdentures: To increase the stability of a lower or upper denture, it’s possible for it to be securely anchored using two or more dental implants. The upper jaw requires more implants (generally three or more) than the lower jaw due to a lesser bone density. Many people find this option offers a great balance of comfort, functionality and value.

Types of Partial Dentures

Transitional Partial Dentures: These relatively inexpensive removable plastic dentures serve as a temporary tooth replacement and space maintainer as you wait for your mouth to heal from tooth extraction, for example. Once the healing process is complete, dental implants can be placed.

Removable Partial Dentures (RPDs): Usually made of cast vitallium, these well-constructed, metal-based removable partial dentures are much lighter and less obtrusive than those made of plastic. They are a little more expensive than plastic dentures but will fit better. They are, however, much less expensive than implants or fixed bridgework.

How Dentures Are Made and Fitted

Making quality dentures is a blend of science and art. First, an accurate impression (mold) is made of the alveolar ridges on the top and bottom of your mouth. The base of the denture is made from this mold in a dental laboratory. Working together, the dentist and lab technician choose from among many different sizes and shapes of prosthetic teeth to re-create a natural-looking smile. When everyone is satisfied with the result, the temporary dentures are made in permanent form.

To enable normal speech and eating, it’s crucial to balance your bite. This means that the upper and lower dentures come together and properly stabilize each other. The form and function of the dentures are carefully checked to ensure that they are working and fitting properly.

What to Expect After You Get Dentures

If you’ve recently lost your teeth and received an immediate denture, it’s normal to find some tissue shrinkage and bone loss occurring. Therefore, in several months you may find that your immediate dentures no longer fit well. You will have two choices at this point: You can have your immediate (temporary) dentures re-lined. This means that material is added under the denture’s base to better conform to the new contours of your alveolar ridge. A better option is to move to a set of conventional full dentures, which will last longer and fit better. With proper care, dentures offer a functional, aesthetic and economical solution to the problem of tooth loss.

Porcelain Veneers

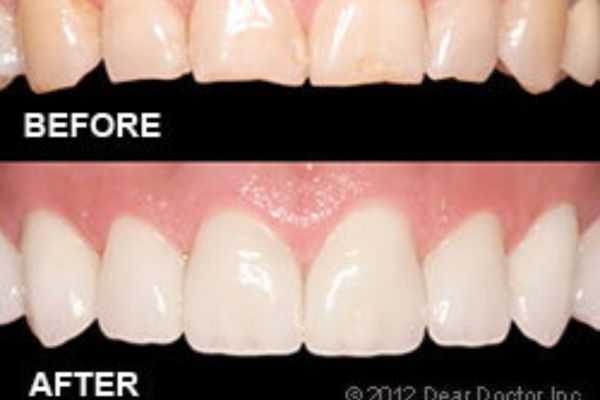
What makes a smile beautiful? That’s a complex question, but some qualities of a lovely smile are immediately identifiable: good tooth color, shape and alignment are a few of the most important ones. If your teeth could use improvement in any of these categories, porcelain veneers could be just what you’re looking for.

You may already know that a veneer is a thin covering over another surface. In dentistry, a veneer is a wafer-thin layer of super-strong porcelain that convincingly substitutes for natural tooth enamel. When bonded to your teeth, veneers can create a natural-looking, beautiful new surface. That’s because dental porcelain, like natural tooth enamel, is translucent and tough. But it doesn’t stain like tooth enamel does.

Recent years have brought remarkable advances in dental porcelain technology. These days, veneers can be made so thin that they can sometimes be bonded directly onto your existing tooth surface. In other cases, a very thin layer of tooth enamel — as thin as the veneer itself — needs to be removed to fit the new porcelain surface and make it look as lifelike as possible. Either way, the results are sure to make you smile.

Versatility of Porcelain Veneers

Veneers can be used to improve any of the following characteristics of your teeth:

  • Color — Teeth can become stained by the foods and drinks we like, from smoking, and even normal aging. Veneers are available in numerous shades, from the most natural to the brightest Hollywood white.
  • Size & Shape — Teeth can become worn down from grinding habits, or may not have the shape or size you want to begin with. For example, some people consider rounder teeth more feminine and squarer teeth more masculine. Veneers can be shaped and sized in whichever way is most flattering to your face.
  • Alignment & Spacing — Veneers can be used to close small gaps between teeth or make slight corrections in alignment while improving tooth color and shape.

Limitations of Porcelain Veneers

There are some situations in which veneers would be inappropriate. For example, if you have significantly misaligned teeth or a large gap, orthodontics might be a more appropriate solution than veneers. And if you have lost a lot of tooth structure from decay or trauma (or a particularly severe grinding habit), it might be better to restore your teeth with porcelain crowns that cover the entire tooth.

Creating a New Smile with Porcelain Veneers

The first step in creating a new smile with porcelain veneers is to communicate exactly what you don’t like about your smile as it is now. It’s a great idea to bring in pictures of smiles you do like, as a starting point for discussion. It’s possible to see how veneers would look on your teeth in one of several ways. A model of your teeth can be created over which wax “veneers” can be placed; sometimes acrylic (plastic) or tooth-colored filling material can be placed directly onto your teeth to demonstrate the effect veneers would have on them.

Once the plan has been agreed upon, your teeth will be prepared by removing a small amount of enamel, if this step is necessary. Molds of your teeth will be taken and used by a skilled dental laboratory to create your veneers, and you will receive a temporary set of veneers to wear during the few weeks it will take to create your permanent veneers. When the veneers come back from the lab, they will be cemented onto your teeth.

Caring for Your Veneers

Just like the teeth nature gave you, teeth restored with veneers need gentle brushing and flossing every day. This will remove dental plaque and ensure good gum tissue health around the veneers. Regular checkups at the dental office will remain as important as always to your oral and general health. And keep in mind that as tough as veneers are, they may not be able to withstand forces that come from using your teeth as tools (to open packages, for example) or biting into very hard foods like candy apples — which isn’t good for your natural teeth, either! And if you grind or clench your teeth at night, you might be advised to get a custom-made nightguard to protect your veneers — and your investment.

How To Floss

You always brush twice a day, avoid sugary snacks between meals, and go to the dentist regularly. Do you still have to floss your teeth?

The short answer: Yes, at least once a day. Flossing is probably your single most important weapon against plaque, the clingy bacterial biofilm that sticks to the surfaces of your teeth. Plaque is the principal cause of tooth decay; but it is also the cause of periodontitis (gum disease), bad breath, and other maladies. Brushing is a good start — but flossing removes plaque in places a brush can’t reach, like the small gaps between teeth and under the gums. It also polishes tooth surfaces and decreases the risk of gum disease.

Some people may think they don’t have time to floss, but once you get the hang of it, flossing only takes few minutes. If you are going to floss only once a day, it’s best to do it at night just before going to sleep. That’s because there is less saliva present in your mouth when you are sleeping, so plaque is more concentrated and potentially more harmful. Just in case you never really learned proper flossing techniques, here’s a step by step approach including some easy tips for doing a great job.

Proper Flossing Technique

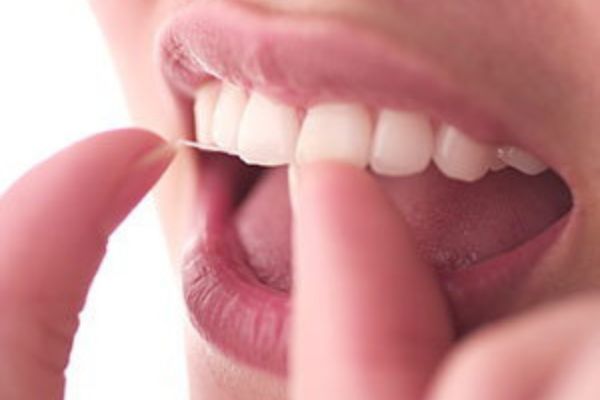
  • Cut off a piece of floss about 18 inches long. Wind it around the middle finger of both hands leaving a gap of around three or four inches. You will now be able to use different combinations of your thumbs and index fingers to correctly position the floss between your teeth for all areas of your mouth.TIP: The most common mistake people make while flossing is that they tighten their lips and cheeks making it impossible to get their fingers into the mouth. Relax your lips and cheeks.
  • Now, guide the floss gently into the space between your teeth.TIP: Even if the gap is tight, try not to snap the floss into your gums as you’re inserting it. A side-to-side sawing motion is good to use here, but only when slipping the floss gently between the teeth.
  • There are two sides to each space between your teeth and you must floss each side separately so as not to injure the triangle of gum tissue between your teeth. Run the floss up and down the surface of the tooth, making sure you are going down to the gum line and then up to the highest contact point between the teeth. Apply pressure with your fingers away from the gum triangle, letting it curve around the side of the tooth forming the letter “C” with the floss.TIP: You want your fingers as close to the front and back of the tooth as possible so both fingers move in harmony up and down until you hear a squeaky clean sound. This is easier with unwaxed floss. The smaller the amount of floss between your fingers, the more control you have flossing.
  • Next, move your fingers to the top contact area between the teeth and slide across to the other side of the space. Apply pressure with your fingers in the opposite direction and repeat.
  • Slide the floss out from between the teeth. If it’s frayed or brownish, that’s good: you’re removing plaque! Unwind a little new floss from the “dispenser” finger, and take up the used floss on the other finger.
  • Repeat the process on the next space between teeth. Work all around the mouth — and don’t forget back sides of the last molars.

Variations for Comfort

If you’re having trouble with the two-finger method, here’s another way to try flossing: Just tie the same amount of floss into a big loop, place all your fingers (but not thumbs) inside the loop, and work it around your teeth with index fingers and thumbs. All the other steps remain the same.

Once you’ve got the basics down, there are a few different types of flosses you can try, including flavored, waxed, and wider width. Some people find waxed floss slides more easily into tighter gaps between teeth or restorations — but it may not make that satisfying “squeak” as it’s cleaning. Others prefer wide floss for cleaning around bridgework. But whichever way works best for you, the important thing is to keep it up!

How To Brush

If you’re like most people, you probably learned how to brush as a child… and chances are, you haven’t thought about it much since then. That’s understandable — but there may come a point when we find our oral hygiene techniques could use improvement. Here are a few tips on the proper way to brush your teeth… plus, a reminder of why we do it.

First, the reasons why: Brushing is an effective way to remove plaque — a sticky, bacteria-laden biofilm that clings stubbornly to your teeth. The bacteria in plaque produce acids, which erode the tooth’s enamel and may lead to tooth decay. Plaque can also cause gum disease and bad breath. In fact, it’s believed that over 90% of dental disease is caused by plaque accumulation alone.

Besides removing plaque, the fluoride in toothpaste strengthens tooth enamel and makes teeth more decay-resistant. Plus, brushing makes your mouth feel cleaner and your breath smell fresher. While there is no single “right” way to brush your teeth, there are a number of techniques that can help you get them squeaky-clean. So why wait — let’s take a refresher course in brushing right now!

Proper Brushing Technique

  • To begin, select a small-headed, soft-bristled toothbrush, grasp it gently with your fingers (not your fist), and squeeze on a pea-sized dab of fluoride toothpaste.
  • Hold the bristles gently against the outside of your top teeth, near the gum line, at about a 45-degree angle upward.
  • Sweep the brush gently back and forth over teeth and gums in soft strokes — or, if you prefer, use an elliptical (circular) motion to clean the teeth.
  • Be sure to clean the spaces between teeth: You can use a sweeping motion to brush food particles away from the gums.
  • When you have done one brush-width, move to the adjacent area of your teeth and repeat. Keep going until you have finished cleaning the outside of the whole top row of teeth.
  • Move to the bottom teeth. Repeat the procedure, tilting the brush down toward the gum line at about 45 degrees. Finish cleaning the outside of the bottom teeth.
  • Go on to the inside of the top teeth. Tilting the bristles up toward the gums, clean the inside of the top teeth with gentle but thorough strokes.
  • Move to the inside of the bottom teeth. Tilt the brush down and repeat the procedure.
  • Now it’s time for the chewing surfaces: Holding the bristles flat against the molars, clean the ridges and valleys of the back teeth. Do this for all the top and bottom teeth.
  • Finally, brush your tongue gently to remove bacteria and freshen breath.

Check Your Work

How good a brushing job did you do? One way to get an idea is by simply running your tongue over your teeth: If they feel slick and smooth, then chances are they’re clean. If not, you should try again. To know for sure whether you’re brushing effectively, you can use a “disclosing solution” — a special dye that highlights plaque and debris your brushing missed.

One common error is not brushing for long enough: two minutes is about the minimum time you need to do a thorough job. If you have music in the bathroom, you could try brushing along with a pop song; when the song’s over, you’re done! But no matter your musical taste, good brushing technique can go a long way toward maintaining tip-top oral hygiene.

Variations for Comfort

If you’re having trouble with the two-finger method, here’s another way to try flossing: Just tie the same amount of floss into a big loop, place all your fingers (but not thumbs) inside the loop, and work it around your teeth with index fingers and thumbs. All the other steps remain the same.

Once you’ve got the basics down, there are a few different types of flosses you can try, including flavored, waxed, and wider width. Some people find waxed floss slides more easily into tighter gaps between teeth or restorations — but it may not make that satisfying “squeak” as it’s cleaning. Others prefer wide floss for cleaning around bridgework. But whichever way works best for you, the important thing is to keep it up!

Brushing & Flossing With Braces

You know how important it is to brush and floss properly when you’re wearing braces — but what’s the best way to do that? Let’s start with the basic brushing tools: Either a soft-bristle brush or a bi-level brush (one that has shorter bristles in the middle and longer bristles at the edges) can be effective. Used carefully, an electric toothbrush can work just as well. But be sure the electric brush is set to a moderate power level, and don’t let its vibrations cause the back of the brush to hit the braces!

You should brush with a fluoride toothpaste at least two times per day (preferably after meals), for at least two minutes each time. Remember to brush all of the tooth surfaces: the outside, the inside, and the chewing surfaces as well. Be especially careful to clean the areas between wires and teeth, and between brackets and gums — that’s where food particles can easily become trapped.

Here’s a suggested brushing technique: Beginning at the outside surfaces, place the tips of the bristles flat against your teeth, and use small circular motions to gently polish them clean. For areas between braces and gums, tilt the brush toward the gum line (down for the bottom teeth, up for the top) while keeping up the circular motions. Next, move on to the chewing surfaces of upper and lower teeth, using a firm back-and-forth motion. Finally, finish up by carefully brushing the inside surfaces of the teeth the same way you did the outside surfaces.

Special Brushing Tools

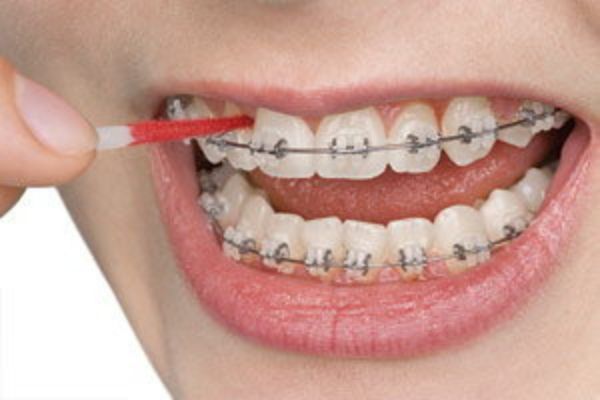
If you’re having trouble cleaning the areas near brackets and wires, there are some special tools that may help. One is the interdental toothbrush, or proxabrush. It has a small tuft of bristles that stick up all around, like a pipe cleaner. Use it gently and carefully to clean the tiny spaces under wires and around bands and brackets.

Another special cleaning tool is the oral irrigator or “water pick.” This device shoots a small stream of pressurized water at your teeth, which can help dislodge bits of food that become trapped in nooks and crannies. While it’s easy to use, an oral irrigator isn’t a substitute for a toothbrush or dental floss — but when used along with proper brushing and flossing techniques, it can be very effective.

Floss Fundamentals

To keep your teeth and gums clean and healthy, you need to floss at least once per day. But how do you get floss under the archwire of your braces? It’s not so hard with the help of a floss threader. Using this device is somewhat like threading a needle: You pull one end of floss through the threader, and then push the threader — carrying with it the free end of the floss — under the archwire. Now grasp the floss on each end and slide it up and down the sides of both teeth, and all the way under the gums until you hear a squeaky sound. Finally, pull it out and use a new section of floss for the next area.

Full Disclosure

Ever wonder how effective your tooth-cleaning techniques really are? There’s an accurate way to tell, using special vegetable dyes called “disclosing solutions” or “disclosing tablets.” As they dissolve in the mouth, these dyes highlight plaque and food debris that brushing has missed. You can then easily remove the dyed spots — and you’ll know for sure if your oral hygiene methods need a little “brushing up.”

Keeping your teeth and gums healthy now is an investment in your future. It enables you to get the best results from your orthodontic treatment, and starts you toward a brighter smile that can last for a lifetime.